Search Feature

Tuesday, November 26, 2019

Canning Bacon


Canning again.  I feel like a squirrel, putting things away for the winter! lol
I've tried a few of those shelf stable, half cooked bacons that are ready to eat after zapping for a few minutes in the microwave. They are quick and handy to have, but I wanted to make my own and save a bit of money.
I'm not recommending this method... just posting how it worked out for me.

I used thick sliced bacon and partially cooked it in a 375F degree oven. About 8 minutes, or just until the bacon took on some color, but was still limp. Then drained the drippings into a pan.


I dabbed the excess drippings from the strips of bacon. Placed them on a sheet of parchment paper...


Folded the edges of the parchment paper over the end strips of bacon, then folded the paper over the bacon. Then folded the bacon up, in half. The idea is to keep the bacon separated by paper so they won't stick together.


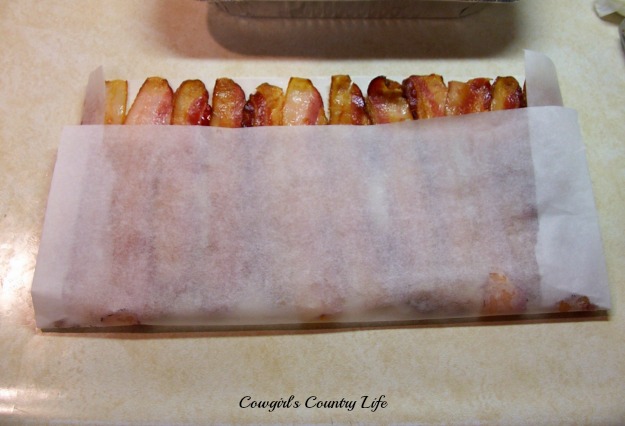
Next, I rolled the bacon up and plopped it into a clean, sterilized pint jar...leaving one inch of headspace.


Wiped the rim of the jars with white vinegar, to remove any oils. Topped with a hot lid and placed the jars into the pressure canner.


I processed the bacon at 12lbs of pressure for 75 minutes. Check your area for times and pounds at your location.  


I brought the bacon drippings up to a boil and let it simmer for a few minutes before pouring into sterilized jars and inverting to seal.


This method of partially cooking the bacon first, makes for less drippings in the finished, canned jars of bacon. I like it!


I gave the bacon a taste test the next day....


I placed three on a paper plate to microwave for one minute...


also fried a few slices in a skillet...


The bottom three were the microwaved slices.. the top were pan fried...


Heck, I like how it turned out. The microwaved bacon only took one minute, the pan fried a bit longer. I like crisp bacon!
The texture of the canned bacon, straight out of the jar, is a bit softer than the store bought. Once you cook it, it turns out just like crisp, regular ole bacon.
No difference in flavor, it tastes like bacon!

I ended up with a case of bacon. It has been coming in handy. I like that it's shelf stable!

I've used it for breakfasts so far and bacon wrapped shrimp. Hopefully I'll post the shrimp cook soon.

Hope everyone is healthy and happy. Thanks for stopping by!


Saturday, November 23, 2019

Cactus... Stuffed, Hog Tied & Grilled


I like cactus, but don't think to make it very often. The pasture is full of prickly pear. I use the fruit for jelly and wine and usually grab the younger cactus pads for cooking. This time, I grabbed some larger pads that were at the grocery store. I hoped they would be cleaned, but they weren't. lol
Some jelly....
https://cowgirlscountry.blogspot.com/2008/09/prickly-pear-cactus-jelly.html

I started by cleaning the cactus pads. Held them over the fire to burn off some of the thorns...


They look like little candles. lol


Next, I scraped any burnt or remaining thorns off with a knife, then washed the pads well...


Next, I prepared my stuffing..
corn, red pepper, scallions, onions, garlic, conecuh sausage, cilantro, (shrimp and pepperjack cheese not in the pic).


I grilled the corn and saved the husks...


Browned my conecuh sausage with onions, scallions, peppers, garlic....


added some cubed cactus....
Cactus has a texture like okra. I like to cook the "slime" out before using as stuffing.


The grilled corn....added mexican oregano, salt, pepper and chopped cilantro.
Cooked til the cactus was tender, then let the filling cool.


Cut a pouch in the cactus pad....


Ready to stuff!


I stuffed the pad with the sausage/cactus/corn mixture, shrimp and pepperjack cheese..


I "stitched" the pads closed with strips of corn husk, to keep the filling inside...


Oiled, salt and peppered.... ready for the grill!


I grilled the cactus pads with indirect heat at first. About 10 minutes per side. I wanted to heat the filling through, also cook the outer pad so it would be tender.


Then directly grilled them for a few minutes to melt the cheese and make sure the shrimp were cooked..


Ran my knife around the top, and opened the "lid"...


The stuffing smelled incredible... the cheese was gooey, the cactus was tender, the conecuh sausage added a nice smokey aroma...


Served with a couple of fresh hot corn tortillas and a cold beer....


It was tasty! The cactus was nice and tender, the smoked sausage added a lot of flavor, the pepperjack cheese added just enough heat for me. It was almost a comfort meal, with the gooey cheese and tender shrimp. lol  The outer cactus pad is edible too, so it made a big meal for me! 

The stuffings are endless. I'll be doing this again!

A side note... People who live in cactus country do not call these "Nopales". They are known here as cactus. Sometimes they are referred to as "blankity blank" cactus....depending on whether they have flattened your tire or not. But not once have I heard of anyone calling them "Nopales". lol

Hope everyone is doing well. Thanks for stopping by!